You can now send money through Gmail, fee free – Google Wallet integration

gmail-google-wallet

Gmail now has Google wallet integration.  If you link your debit card or bank account, there is no fee for sending money.

Here is how to set it up:

  1. Open Gmail.
  2. Click the Compose button.wp-1489511407511.png
  3. Enter the email address of the person you want to send money to.
  4. Add a subject and message text (optional).
  5. Click the $ icon (£ for UK users).wp-1489511390853.jpg
  6. If you don’t have Google Wallet yet, you’ll be asked to set up your account.
  7. To send money: Enter the amount you want to send and choose a funding source.
  8. To request money: Click Request at the top of the box, and enter the amount you’d like to request.
  9. Click Attach.
  10. Review your message and click Send.

source – Google

Save your money and get this app

I don’t know when the last time I paid for an app was, (and no I am not getting them illegally somehow).  By signing up for google opinion rewards you can make between $0.10 and $1.00 for answering surveys that usually take less than a minute of your time.

screenshot_20170214-204649-01google-opinion-rewardsgoogle-opinion-rewards-630x354

Over time the rewards can add up!

screenshot_20170214-204708

If you like free apps, books, and movies, you should get the app and start letting google pay for your stuff.

google-play-button-new-e1460739245700


Do you need that app

If you have a newer Android phone, you may find that an app you used before is now baked right into Androids OS so you don’t need it anymore.  Here is a list of some common apps that you should delete right now!

  1. Flashlight app – These apps are very common and many of them have very invasive permissions to your phone.  In addition to this, almost every phone purchased in the last two years already has a flashlight available as a standard feature.
  2. File Browser –  In the past this was a needed feature, but has now become integrated into most new phones.
  3. Anti-Virus – Unless you are downloading apps and side loading (If you do not know what side loading is then odds are you are not doing it) then you do not need an antivirus.  Google makes it a top priority to keep malicious apps out of the play store.
  4. Cleaner Apps – These apps are very common but provide very little benefit.  They often come with annoying ads in the lock screen and constant reminders to scan your device.  If you feel that you need such an app the only one I have found that is not invasive and annoying is ccleaner.
  5. Any other app you have not used in the last few months.  If you are not using it and you have no intention to use it, remove it! Your phone will thank you.

Apps can make your phone great! They can add functionality and fun. However, when an app becomes redundant or invasive, it needs to be removed.  Every app uses system resources. You may just find that the 5 minuets you will spend removing bad or unused apps will make your phone run longer and faster.  As always please feel free to respectfully disagree or add anything that I may have missed in the comments or via the contact page.

Don’t pay for home phone service…

I’ve been using Google Voice for my home and business phone service since 2011. With this app, you can use a cell phone that is designated exclusively for this purpose, or add a google voice number as a second line to an existing, in service cell phone, like me wife does on her Nexus 6p for her business. I have found that outside of the tech world not many people know about this option, but everyone I tell about it wants to give it a try. If you’re needing a phone line to be used exclusively in a place where you have WiFi, give it a try.

Let google be your free home phone service! I will be using a Nexus 5 for my home phone.

screenshot-2017-02-21-at-10-24-37-am

  1. go to voice.google.com, sign in to your gmail account and select a phone number.  I created a new email account for the family, so that my personal email account was not available for anyone to use.screenshot-2017-02-21-at-10-24-53-am
  2. Use an Android phone you have lying around or if you don’t have a new enough one available, an inexpensive one will do.
  3. Start fresh – wipe and reinstall the operating system.wp-1487701140346.png
  4. Log in to your gmail account.wp-1487701145053.png
  5. Download the google voice app from the app store.  Make sure it is the official Google app and not one of the many third party ones.wp-1487701135257.png
  6. Make sure all apps are up to date via the play storewp-1487701116955.png
  7. Open the app and sign in.
  8. Enter the cell phone number linked to the account.wp-1487701113197.png
  9. Set google voice to use for all calls.wp-1487701108219.png
  10. Get the hangouts dialer – This is necessary to make calls via google voice.wp-1487701130115.png
  11. Open hangouts and make your first call or text.wp-1487701210597.jpg
  12. For now, hangouts is the best way to interface with google voice but google has been updating the google voice app and may at some point replace hangouts for calls.
  13. Get a durable case – because kids drop stuff.

Android Wear 2.0 – Do more

Google has announced their new operating system for smart watches, Android 2.0.  Here is a quick rundown on some of the new features.


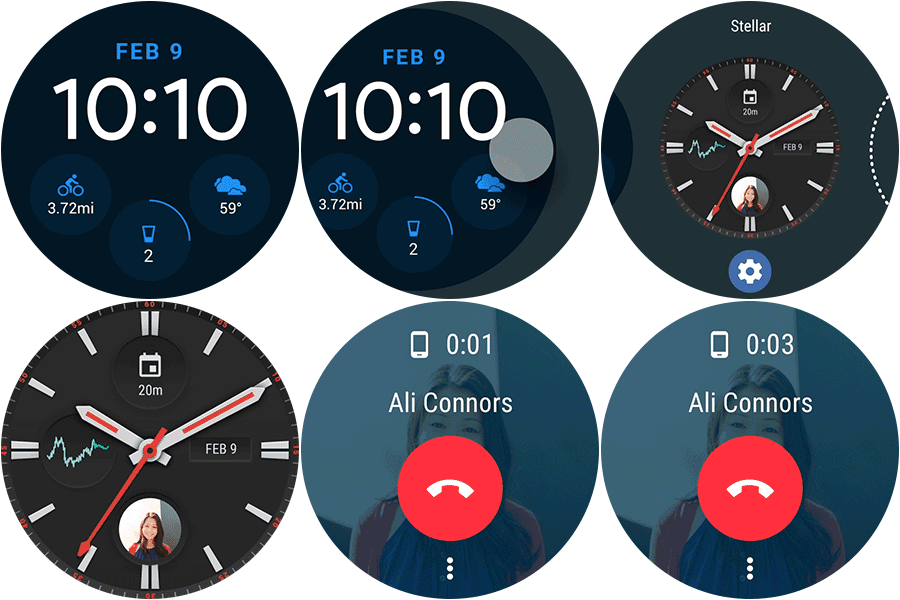
Android Wear 2.0 Watch Face

More personalized, helpful watch faces

You can now personalize your Android Wear always-on watch face with information and actions from your favorite apps. Simply glance at your wrist to check your next appointment, stock performance, progress on fitness goals, or whatever is important to you. A quick tap on your watch face lets you instantly order an Uber ride, start a workout, or get in touch with your significant other. Interested in different info throughout the day? Just swipe to switch your watch face as you go from the office to the gym to dinner with friends and home again.

Better ways to work out

Google Fit, the pre-installed fitness app on most Android Wear watches, now lets you track your pace, distance, calories burned and heart rate* as you’re walking, running or cycling. You can also measure weight-lifting reps, in addition to push-ups, sit-ups and squats. When you work out with a cellular-connected Android Wear watch, you can stay in touch with calls and messages, stream tunes from Google Play Music and still use your favorite apps right on your watch.

New ways to use apps

With Android Wear 2.0, you can choose which apps you want on your watch and download them directly from the new on-watch Google Play Store. If your watch has a cellular connection, you can make calls and use your watch apps no matter where your phone is. Whether you use an Android phone or iPhone, you’ll be able to use apps built for Android Wear 2.0, like AccuWeather, Android Pay*, Bring!, Foursquare, Google Fit, Google Messenger, Google Play Music, Lifesum, Robinhood, Runkeeper, Runtastic, Strava, Telegram, Uber and many more.

More ways to respond to messages

Now it’s easier than ever to read and respond to a message right from your watch. When you receive a message, you can expand the notification and tap to respond by dictating, typing or handwriting your answer, or drawing an emoji. Try it out on apps like Facebook Messenger, Glide, Google Messenger, Hangouts, Telegram or WhatsApp. Need to respond quickly and discreetly? Use Smart Reply, which instantly and intelligently suggests different responses based on the message you received.

The Google Assistant on your wrist

Android Wear 2.0 brings the Google Assistant to your wrist, so you can find answers and get things done—hands free. Ask your Google Assistant about the weather or remind yourself to bring an umbrella. Make a restaurant reservation or navigate to work. You can even update your shopping list right from your wrist. To ask for help, just hold down the power button on your watch or say “Ok Google.” The Google Assistant is available in English and German on Android Wear and will be available in other languages in the coming months.

source – Google Blog

Don’t Lose Your Photos

Google offers an array of features that I have found most people aren’t using.  For the most part, people who I come in to contact with are not aware that these services are available and just use the ones that the carriers tell them to use.  The freedom to access your data and take your data with you is one of the most important features to me.  When you use a service like the Carrier’s cloud (ie Verizon and At&t) they do not make it easy for you to take that data with you if you switch to another carrier.  Google photos on the other hand is a free, unlimited, hi-res photo and video back up service that makes it easy to keep and share your media.

Just open the Google Photos app and log in to your account, your photos will begin to back up automatically.

Don’t get fooled by your carrier

Having control over your data seems like it should be simple process, but because of the amount of options available it can be tricky to know which service to use. Android is a great operating system, but sometimes knowing how to properly configure its services in order to maximize the benefit to you can be overwhelming. My hope is to address some of these problems in an effort to make your smart devices serve you better.

The first problem lies with the carriers. Any carrier’s main goal is for you to stay with them so they make if difficult for you to leave. By default, your data will be set to back up to their servers. You may think, “That’s great! Verizon is backing up my data for me. Thanks Verizon!”  There are two problems with having the carrier do this for you.  First of all, your storage is limited and they will often charge you for backups over a certain amount. In contrast, Google will back up almost everything on your phone through their services for free, with very few exceptions. Another issue with running your backups through the carriers is that it’s more difficult to access your data, especially if you want to switch phone companies. Just try it. Tell AT&T you are switching to Tmobile and see how happy they are to transfer your data to the other carrier. With google, it’s simple since everything is attached to your gmail account. Just sign in to your account on your new phone and all of your pictures, contacts, settings, and much more will automatically transfer to your new device.

The second problem is with the manufacturers.  They, like the carriers, want you to stay with them and continue purchasing their devices. Because of this, most of them will provide themselves as a primary or secondary option to store your data. As I stated before, don’t fall into this trap. You may like LG now, but your next phone could be a Samsung. If that’s the case, good luck contacting them to transfer your data!

The final problem also has to do with the manufacturers. Continuity between devices can be difficult when dealing with each manufacturer’s unique user interface.  It is likely that you and your family have multiple devices. If each device has a different manufacturer then you will find that even though they all run Android, they can look very different.  In this case, you can solve the problem by using one of Androids many custom launchers.  Doing this will allow you to have more control over the way that your phone looks. You can set everyone in the house to have a similar look and feel to each other or change and customize your user experience to something more uniquely suited to you.

Android is the most widely used operating system in part because it allows huge freedom of choice in all aspects of its design. However, this great strength can also present a problem.  Keeping control of your data is one of the best ways to keep yourself free and not let a company lock you into staying with them.  If you are not able to access and move your data easily, you will feel stuck and be unlikely to change (even if you want to).  Don’t get tricked. Take control of your device! Know how to easily access your data, and make it look and feel the way you want.

Services referred to in the article

Photo backup – Google Photos

Contacts – Gmail

Files – Google Drive 

These apps are already on most Android devices they just need to be updated and activated/opened

Android Launchers – phandroid.com has a good article about diffrent launchers

Quick Tip – quickly toggle between two apps

I have recently discovered that a feature I have used for a long time is a relatively unknown to many Android users. It’s a small thing but helps users to navigate between windows more quickly.

wp-1487611938708.png

By tapping the square on the bottom right of your phone, you can quickly switch between two apps. So, next time you are texting someone and also doing a google search you can quickly switch between the two.

Basics – Setting up a printer on a chromebook

Over the past few years, it has been getting easier and easier to set up a printer on your Chromebook.

Quick Set-up instructions

  1. Click on the user icon at the bottom right of your screenscreenshot-2017-02-16-at-9-19-58-pm
  2. Click “Settings”, scroll down and click “Show advanced settings”
  3. Scroll until you see the setting for “Google Cloud Print”screenshot-2017-02-17-at-4-52-43-pm
  4. Choose your printer from the listscreenshot-2017-02-17-at-4-53-18-pm

Here are some google videos that walk you through setting up a traditional printer and a cloud printer.

Cloud printing can be very handy if you are printing things on the go.  It gives you the ability to send files from anywhere right to your home printer.


If for some reason your printer is not supported by Google Cloud Print, I found an alternate wifi chrome app that sets up a local IP based printing service.

  1. Open the Chrome Store
  2. Search for HP Print (or click the link)
  3. Download and openscreenshot-2017-02-17-at-4-53-48-pm
  4. Go to your printer and print off its’ set up page.  On this page you will see the printer’s IP address.
  5. Once you have this, click “add printer,” enter the IP address and give it a name.screenshot-2017-02-17-at-4-54-08-pm


Basics – Chomebook – Making the most of your touchpad

Move the pointer Move your finger across the touchpad.
Click Press or tap the lower half of the touchpad.
Right-click Press or tap the touchpad with two fingers. You can also press Alt, then click with one finger.
Scroll Place two fingers on the touchpad and move them up and down to scroll vertically, or left and right to scroll horizontally.
Move between pages To go back to a page you were just on, swipe left with two fingers. To go forward to a page you were just on, swipe right with two fingers.
See all open windows Swipe up or down with three fingers. (If you have Australian scrolling turned on, swipe up; if you have traditional scrolling turned on, swipe down.)
Switch between tabs If you have multiple browser tabs open, you can swipe left and right with three fingers to quickly move between tabs.
Drag and drop Click and hold the item you want to move. While holding, move the item. Release your finger to drop the item at its new location.

Change touchpad settings

To set how fast or slow your mouse pointer moves and how your touchpad works:

  1. Click the status area , which is the bottom right corner.
  2. Click Settings Settings.screenshot-2017-02-16-at-9-19-58-pm
  3. In the “Device” section, adjust the sliders to set your touchpad or mouse speed (how quickly your pointer moves).screenshot-2017-02-16-at-9-18-01-pm
  4. Click Touchpad settings (or Touchpad and mouse settings) to:
    • Turn tap-to-click on or off
    • Swap your primary mouse button
    • Choose traditional scrolling or Australian scrolling
      Note: With traditional scrolling, you can swipe up on the touchpad to move up the page, and swipe down to move down. Australian scrolling works in the opposite way.screenshot-2017-02-16-at-9-18-17-pm
  5. Click OK to confirm the desired setting

source – google